Dutch Tom Biesot has shown his skills in making tying tools before, and now takes his Hummingbird bobbin holder to new levels.

The regular visitors of the Global FlyFisher have probably read one or more articles of mine, such as "Tom's Reel", "Tom's Vise" or "Tom’s bobbin holders". The last article "Tom's bobbin holders" has generated a lot of positive reactions and discussions lately.
It was the intention from the beginning to make several copies of the hummingbird, as it is extremely pleasant to use. If you have not read the previous article, it is recommended that you also read this article. It describes how to work with and hold the Hummingbird. Due to its special shape it has a different grip compared to a standard bobbin holder. You can grab it in two ways as described. It also explains how you can easily wind the tying thread with one hand by rotating the bobbin with your middle finger.

In this new article I describe the manufacturing process of the new Hummingbirds on the basis of many photos and less text.
The holder of the old Hummingbird was made of a tropical hardwood called Zebrano, so that it matched the overall design and choice of materials of my vise (see also the articles "Tom's Vise" and "Tom’s complete vise project").
Custom design and new materials
Over the past year I have adjusted the design, the holder has become 10% larger. I also changed the angle of the tube and I changed the shape of the body, as you can see in the drawing below. The appearance now looks modern, especially with the weight-saving holes.
In the beginning I went for two new materials for the holder, namely aluminum and a dark brown reinforced plastic. Both materials are relatively easy to machine with conventional machines and hand tools. With CNC machines it would all be much easier, but I don't have one. The new design was printed out in full size and glued to the materials.


After this I roughly sawed out everything with a metal saw, a long chore! Then partially milled on the milling machine. I finished the finer shapes with a file and with a small sanding cylinder on the lathe.


For the difficult corners I used a small diamond cutter. After many hours the final shape has been reached, now I have to drill the weight-saving holes.


Ceramic tubes
In the old model I used a ceramic tube. I bought an expensive bobbin holder and managed to get the tube out of the frame with the heat of a lighter, it was glued in. That bobbin holder was 18 euro, a lot of money for an ceramic tube for my holder. For the new Hummingbirds I searched the internet for affordable ceramic tubes. To my surprise, these are almost impossible to get. The only company I found was in Romania and is called "Troutline", but that was an unknown for me. But soon I'll order some tubes there to see how it goes.
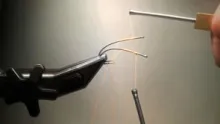
My alternative consisted of buying relatively cheap bobbin holders (6 euro), these have a steel tube with a ceramic bead on both sides, these holders work well in practice. I have removed the tubes from the frame with a lighter and sawn to length by shortening the tube on one side . This side must be rounded and polished with fine waterproof sandpaper with a very fine grit and a polishing wheel. The tube is glued into the holder.


I turned the thin shaft on the lathe with a M3 thread on one side and glued the other side in the holder. Then I turned the plastic "Rulon" shaft, where the bobbin rotates over. It is fixed with a small screw.


The special guide ring
When I was designing the Hummingbird, one of the most critical and difficult stage was to find out how to get the tying thread into the tube without friction and with no problems related to rotation of the bobbin. It seems so easy now, but the use of that little guide ring was the key to success for the Hummingbird . For over a century we have been using bobbin holders, which have almost never changed in design, as for the position of the bobbin! The small guide ring is angled on the top part of the holder, so it doesn't get in the way during tying.


The drag system
With this design a fine drag system is very important and the proven drag system of the old model has also been used for the new models. It is a system with two "Rulon" disks and a felt disk. Manufacturing this drag system is a precise job on the lathe and milling machine.


When all parts are ready, the guide ring must be glued into the holder at the correct angle. Also the foam grips can be applied on the holder, for a secure and soft grip.


Carbon fiber Hummingbirds
While making the two models of aluminum and reinforced plastic, I got the idea to make a Hummingbird from Carbon fiber. I had carbon fiber sheet material, but this was only 3 mm thick. I glued two sheets of 3 mm together with two component epoxy glue, so that the starting material was 6 mm thick. Following the same process I ended up making 2 carbon fiber holders. But I had misjudged the fact that carbon fiber is a difficult material to machine with conventional tools, it is very tough. The fibers are very difficult to cut. I have had to use a lot of carbide and diamond tools to get the intended result. It was a time-consuming affair in the end, but they are beautiful to see. Worthy of Formula 1!


Below are some pictures of the models in the different materials. They all look good. One of the pictures also shows the old model in Zebrano wood. The new holders are 10% larger.


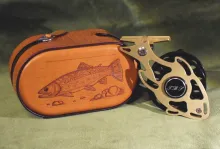
Leather cases
To protect the Hummingbirds during transport, I made leather cases for each model. I have a little experience with processing leather. My wife makes beautiful bags, also from leather, and I may often apply the hardware, such as snaps and rivets and do some hand sewing in leather. First I made a drawing for the pattern and then I cut out the leather with a front and back pattern. Then I glued the two parts together with leather glue on the edges only. After that, tapping with a hammer on the glue joint. After this the snaps are placed.


The edges are sewn by hand with a so called "saddle stitch". The holes must first be made with a "stitching chisel", so that they all have the same distance. For clamping during sewing I use a homemade tool that is called a "Stitching Pony". This is a tool commonly used by leather workers. I advise those who also want to make leather cases themselves for reels or other things, to read the books "The Art of making Leather cases" volume 1 and 2, and "The Art of Hand Sewing leather" written by Al Stohlman. These are illustrated in great detail.


After sewing, the edges are sanded smooth and painted with a so-called edge-paint. The edges can then be burnished with a "burnishing tool". On front I placed my logo "TBS", which stands for, Tom Biesot Special. One case for the old model and four for the new models.


A Zebrano wooden stand
For the practical use of the bobbin holders, I made a nice stand from Zebrano wood, so that the appearance matches with the materials used in "Tom's complete vise project". I made these on my wood lathe .


Another chapter has ended in the vise project. I think it will never be complete, because there is always something to invent and to design for my flytying bench... but there's not much room left!

I hope you liked the "Hummingbird" story. They are very nice bobbin holders and fun to work with. Good to know: I don't make them for commercial purposes!
- Log in to post comments