The intent of this swap was for each member to provide a dozen streamers which represented the Rainbow Smelt in casting sizes. Some of the entries were "recognized" patterns, but many were original dressings.
- Smelt #1
- Smelt #2
- Ripogenus Smelt
- Ouananiche Sunset
- Sawbelly Special
- Pearlescent Ghost
- Outlet Bay Special
- Crystal Flash Smelt
- Dave's Bucktail Smelt
- DYC Turbo Smelt
- Counterfeiter
- Double Bunny
- Ballou Special
- Millimagassett Smelt
- Magog Smelt
- Fatal Attraction Smelt
- Rainbow Smelt Clouser Minnow
- Grizzback Smelt (Dark)
- Cayuga Lake Smelt
Welcome to the 1998 Flyfish@ Smelt Swap Web Page. The participants of this swap are all current members of the Flyfish@ email listserver. The intent of this swap was for each member to provide a dozen streamers which represented the Rainbow Smelt in casting sizes. Some of the entries were "recognized" patterns, but many were original dressings. Participants could contribute a dozen copies of a single pattern, or a lesser number of mulitiple patterns, providing the minimum of 12 streamers.
The links below will take you to the featured swapper's page where the pattern dressing, images of the streamers, and the flytier's comments can be found. ENJOY!
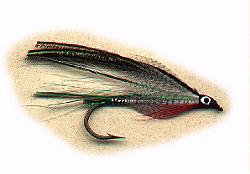
Smelt #1
Submitted By Aaron Adams
| Hook | Mustad AC9672, Size 4 |
| Thread | White |
| Tail | White Marabou |
| Body | Flat Silver Mylar |
| Throat | Fine White Bucktail or Calftail |
| Wing | Light Gray Bucktail, over which are a few strands of Rainbow Flash, outside of which tie one white hackle tip on each side. |
| Topping | Dark Gray Bucktail |
Smelt #2
Submitted By Aaron Adams

| Hook | Mustad AC9672, Size 4 |
| Thread | White |
| Tail | White Marabou |
| Body | White Wool Yarn (or dubbing) |
| Rib | Flat Silver Mylar, Wide |
| Throat | Fine White Bucktail or Calftail |
| Wing | Light Gray Bucktail, over which tie in a few strands of rainbow flash, outside of which tie one white hackle tip on each side. |
| Topping | Dark Gray Bucktail |
Aaron Adams' Comments On These Patterns
I tied the prototype fly for this pattern while still a resident of St. Croix, VI. My father-in-law, who lives in Ithaca, NY, had told me about the great spring runs of smelt in the tributaries of Cayuga Lake. He described the smelt to me over the phone, I I did my best to imitate the description. That first pattern caught some fish, but was not as consistent as he/I would have liked. He did well dead drifting this fly in the current of the stream outflows.
After moving to Boston in the fall of 1997, I began to do some reading on the local baitfish (fresh and salt water) - what else is there to do during a New England winter? I was able to come up with what I hope is an improved pattern over the prototype. I should here some reports from Ithaca in early April.
Ripogenus Smelt
Submitted By Scott Daskiewich

| Thread | Black |
| Body | Orange Floss |
| Rib | Flat Silver Tinsel |
| Wing | 2 grizzly hackles outside of which are 2 dun gray hackles, peacock next to the hook. |
| Throat | Sparse White Bucktail, Golden Pheasant Crest 1/3 length of wing |
| Shoulders | Dark barred teal |
| Cheeks | Jungle Cock (optional) |
| Comments | I like the gray color better than the blue that the original pattern calls for. |
Ouananiche Sunset
Submitted By Scott Daskiewich

| Thread | Black |
| Body | Flat gold tinsel |
| VEILING | 2 golden pheasant crests, one up one down |
| Wing | Two yellow outside of which are two orange outside of which are 2 purple saddle hackles |
| Throat | Red Shlappen next to body then purple shlappen |
| Cheeks | Jungle Cock |
Sawbelly Special
Submitted By Scott Daskiewich
| Thread | Black |
| Tail/Body/Underwing | Holographic tinsel in blue, black, purple or green like I used. |
| Wing | White Bucktail |
| Shoulders | Mallard Flank |
| Throat | Red hackle barbules |
| Topping | Peacock Herl |
| Comments | I culled this one from the 9/97 edition of the Mid-Atlantic Fly Fishing Guide. This fly was apparently developed to imitate sawbellies(alewives) but I say it makes for a better smelt. The original pattern calls for a big eye to be glued on the shoulder but I personally like the painted eye(or jungle cock). When wrapping the body, I also like to let some of the black hook wrap show through to give it that dark but shiny banding that smelt have. |
Pearlescent Ghost
Submitted By Scott Daskiewich
| Thread | Black |
| TAG | Red silk or thread |
| Body | Pearlescent mylar tubing |
| Throat | White bucktail |
| Wing | Couple strands of Peacock herl, over which are a few strands of pearlescent crystal flash, outside of which are 2 to 4 gray saddle hackles |
| Shoulders | Silver pheasant |
| Cheeks | Jungle Cock or substitute. Here I used laquered turkey tail with painted eyes. |
| Comments | Yet another variation of the classic Gray Ghost. The first time I used this version, I caught several nice landlockeds on it |
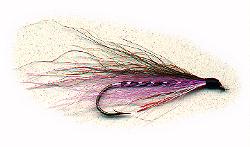
Outlet Bay Special
Submitted By Scott Daskiewich

| Thread | Black |
| TAG | Red silk or thread with unstrung mylar hanging back. |
| Body | Pearlescent mylar tubing |
| Throat | Sparse white bucktail |
| Wing | Pink superhair over which is lavender fish hair over which is peacock herl |
| Shoulders | Dark barred teal or mallard flank |
| Eyes | Laquered white with black pupil |
| Comments | I created this one because I liked the way the lavender fish hair looked in the water. |
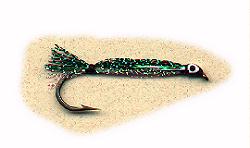
Crystal Flash Smelt
Submitted By Scott Daskiewich
| Thread | Black |
| Body | Mylar tubing(optional/I didn't use any) then: White crystal flash over which is holographic tinsel over which is green crystal flash |
| Tail | Extension of body |
| Eyes | Laquered white with black pupil |
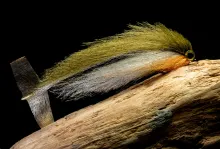
Dave's Bucktail Smelt
Submitted By Dave Dow
| Thread | black |
| Body | black floss |
| Rib | flat silver tinsel |
| Underwing | white bucktail |
| Throat | red bucktail |
| Wing | Lavender Bucktail with 2 strands of Pearl Flashabou |
| OVERWing | olive bucktail |
| Comments | No special tying instructions other than the normal bucktail one: SPARSE! |
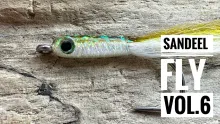
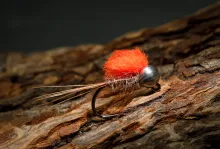
DYC Turbo Smelt
Submitted By Richard Frank

| Hook | #6 Daiichi 2220 |
| Thread | Underbody - 8/0 yellow, Head - 8/0 olive |
| Tail | Peacock Sword |
| Body | Sparkle Lace (tan) |
| Rib | Silver tinsel |
| Throat | Hackle fibers (orange) |
| Wing | Materials as follows: Bottom layer: Axxel (rainbow) 2nd layer: bucktail (pink) 3rd layer: bucktail (pale blue) 4th layer: antron (green) 5th layer: Polarflash (light blue) 6th layer: Axxel (rainbow) |
Richard Frank's Comments On This Pattern
This fly got its name before it was born, and the name, DYC-Turbo, drove the style of the completed fly. At least that's the way it seemed to me. I felt that any fly containing the word Turbo just needed to be "juiced". So the basic idea is to take a traditional and simple bucktail design and "juice it". Mix traditional natural materials and flashy new synthetics and layer them into something juiced and juicy.
The pattern is not difficult, but the layering takes a little time and there are a few details that help keep the elements in balance and make tying easier. Here they are:
- Use 8/0 thread for this pattern, especially for the wing layers and head. 6/0 thread is too bulky.
- Stretch the Sparkle Lace until it is at least half its original diameter before you use it. Trim the end to a thin bevel where you tie it in at the rear and then wrap it with a little space between the turns to leave a natural grove for the tinsel to fall into. This also gives the body more visual depth.
- Tie the Axxel thread in for the bottom layer with the same amount of material pointing forward over the eye. This material can be folded back to form the top layer of the wing. Obviously this is a herl substitute, and some other synthetic - or herl - could be used in its place.
- Tie the pink and blue bucktail in together. The bucktail works well in these lower layers because it is stiff and it flares out to the side making a solid base for the synthetics above.
- Leave all upper layers about an inch longer than needed and shape the wing after the head has been finished. Use a bodkin to divide the antron and Axxel fibers.
That's about it. Now we just need to find out if it really is juicy!
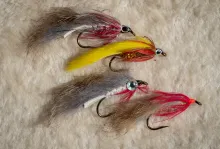
Counterfeiter
Submitted By Lindsey Grandison

Original
| Body | Flat Silver Tinsel |
| Throat | Red Calf Tail, then a Golden Pheasant Crest - with curve toward shank. Length of throat approximately one-third length of hook shank. |
| Wing | Sparse Purple Bucktail under Gray Saddle Hackle - 2 per side. Length of wing one-half to one inch beyond hook bend |
| Topping | Silver Pheasant Creast feather or Peacock Herl . Length - to end of wing. |
| Shoulders | Finely marked pintail flank feather. Length - two-thirds length of wing |
| Cheeks | Jungle cock with third eye showing |
As displayed
| Body | Flat Silver Tinsel |
| Throat | Red Calf Tail, one-third length of hook shank, then White Bucktail, length of hook shank. |
| Wing | Sparse Purple Bucktail under Gray Saddle Hackle - 2 per side. Length of wing one-half to one inch beyond hook bend |
| Topping | Golden Pheasant Crest , length of wing. |
| Shoulders | Lightly marked Teal Flank feather. Length - two-thirds length of wing |
| Cheeks | Jungle cock with third eye showing |
Lindsey's Comments On This Pattern
This pattern was orginated by Bob Veverka, a noted Vermont tier of saltwater and classic salmon patterns. This fly is described in Eric Leiser's "The Book of Fly Patterns" and in Don Wilson's "Smelt Fly Patterns". Wilson's book also includes a good color photo of the pattern; however the the example pictured is a slight variation on the pattern. The depiction shows a Counterfeiter with a white bucktail belly which is as long as the shank.
The considerations I had in tying this pattern are similar to those for most streamers. One variable was the hook size. While a 6 to 8 XL hook in sizes 8 to perhaps 4 would be suitable for casting, larger hooks (8 to 10 XL and sizes 4 and above) would be better suited for trolling. While it is possible to cast these larger flies, they do create some wind resistance. For the example tied, a 6 XL in a size 6 hook was
used. The other consideration was the wing length. Most commercial strung saddle hackle is a little long for the smaller, casting styles of streamers. If the wing is too long, it can foul around the hook bend when cast. Thus it is necessary to not extend the wing far beyond the bend. One must either strip off the base of feather when using strung saddlehackle or select appropriated sized feathers from saddles.
The examples submitted do not adhere strictly to the pattern as originally described. I liked the white bucktail belly and so included that variation. I didn't have a supply of pintail feathers and instead used the lighter colored feathers of some teal flank feathers. Lastly I used a golden pheasant crest feather (yellow) instead of the silver pheasant crest feather (black) or the peacock herl.
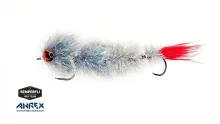
Double Bunny
Submitted By Earle Grossman


| Hook | Mustad 3366 size 2 |
| Thread | Black |
| Body | Lead underbody, covered with Pearl Bill's Body Braid |
| Throat | Fine White Bucktail or Calftail |
| Wing AND BELLY | Contrasting rabbit fur strips 2-3" long, belly 3/8" shorter than wing |
| LATERAL LINE | Pearl Krystal Flash |
| Eyes | 3D eyes with self-adhesive back |
| Head | Devcon 5-minute epoxy |
Earle's Comments On These Patterns
The double bunny smelt is a fly originated by Bill Thompson of Meredith, NH. He adapted this from the double bunny tied by Scott Sanchez for the One-Fly Competition a few years back. I have recently seen the double bunny offered for sale in a couple of catalogs as a saltwater fly.
Tying Instructions:
- Attach thread behind eye and wrap back to bend of hook. Wrap lead underbody. I used size .010 lead for mine as this is a big fly and I definitely want it to sink.
- Overwrap lead with tying thread several times leaving thread at bend of hook. At this point, you can cement your thread wraps over the lead to give it greater stability.
- Tie in Bill's Body Braid at bend of hook and advance thread to inch behind the hook eye, leaving enough room for the attachment of the wing and belly.
- Wrap Bill's Body Braid forward to thread forming a body that is tapered at both ends, but larger at the front near hook eye. Tie off body braid and cut off excess.
- Prepare rabbit strips by cutting them to size, 2-3" inches long depending on the size of hook with the belly strip slightly shorter than the wing. Bill Thompson recommends cutting a v-shaped notch at the front end of each of these strips to facilitate tying them in without creating a bulky head.
- Hold belly strip against hook. With a sharp bodkin, poke a hole in the center of the belly strip right where it would sit against the hook when tied in.
- Poke hook through hole, bring belly strip up firmly against hook and tie in. Use a minimum of tight thread wraps to attach. Tie in wing in similar fashion on top of body.
- Fold wing forward so it is draped over the eye of the hook, giving you free access to the top of the body of the fly. Using a toothpick, spread a small amount of silicone sealer along the top of the body and continue applying sealer to skin side of belly strip. Press wing strip to the body and then to the belly strip, using your finger to remove any sealer that squeezes out.
- Take three or four strands of Krystal Flash (pearl) and attach to side of head of fly using 2-3 wraps of thread, making sure that enough flash extends past eye of hook to equal length extending back over body. Lateral line should run about 2/3 of body length. Fold over Krystal flash so it is all back along side of fly and tie down. Repeat on other side of body.
- Form a nice smooth head, whip finish and cut off thread.
- Attach eyes to side of head with 1/2 of eye over the side of the head and 1/2 over the body of the fly.
- Mix up a little 5-minute epoxy and, using a toothpick, form a nice rounded head with epoxy covering the head all the way to the back of the eye. Remember that epoxy has a mind of its own and you will need to rotate the vise as you apply it in order to have a nice symmetrical head. If you do not have one of those motorized contraptions for drying epoxy flies, continue to rotate the vise by hand until epoxy has dried enough that it does not run.
- Remove fly from vise and allow epoxy to cure (takes several hours). Fly should be placed such that epoxy does not come into contact with any other surface until it is cured.
Comments:
I purchased a tying video this winter called 'Wicked Good Flies for New England" and have been working my way through it. When I saw the double bunny smelt, my instincts told me it would be a great fly for any area where there are smelt. I have tied this fly in three color combinations: olive/white, black/grizzly and deep purple/hot pink. I expect to give this fly a good workout on the local lakes and ponds, as well as the bigger rivers near home. I am also hopeful that the fly will excite some interest from the trout and salmon in far northern NH at the Damn Yankee Clave in June.
Ballou Special
Submitted By Matt Jorgensen

| Hook | Streamer Hook, Size 4 |
| Thread | 6/0 Uni-thread, black |
| Tail | Golden Pheasant Tippets (Original calls for golden pheasant crest feathers) |
| Body | Flat Silver Mylar Tinsel |
| Underwing | Red Bucktail |
| Wing | Blue Dun Marabou (Original calls for white marabou) |
| Topping | Peacock Herl |
| Cheeks/Eyes | None (Original Calls for jungle cock) |
Matt Jorgensen's Comments On This Pattern
Tying Instructions
- Tie on the thread and wind back to the bend.
- Tie on a few golden pheasant tippets for the tail. For this size hook you can tie down the tail at the 2nd black band on the tippets. Trim or bind down the excess along the hook shank.
- Wind forward to the just behind the hook eye, making sure to form a smooth thread base for the tinsel.
- Tie on the tinsel, wind back to the bend, and then wind forward to the eye covering the first layer of tinsel. Tie off and trim.
- Tie on a small bunch of red bucktail for the underwing. I like to use a trick I first saw on Martin Joergensen's home page. (Raske's Note: Now Global Fly Fisher!)Martin suggests first wrapping a loop of thread around just the butts of the hair before tying it down. This helps to insure that the hair will stay on top of the hook where it belongs. A great technique thatI use whenever I'm tying down bucktail or other somewhat unruly materials.
- Next tie down a small bunch of blue dun marabou. This color is somewhat hard to find but I think it really adds to the fly. Page Rogers, an inventive SW fly tyer from Rhode Island was the first person I saw use this color for tails on her epoxy striper flies. I thought it looked great for smelt imitations, too.
- Next tie down a few strands of peacock herl for the topping.
- Form a thread head, tie off, and cement.
Pattern Comments
I originally wanted to put together my own smelt imitation but after about 4 or 5 really hideous looking flies I decided to go back to Joseph Bates' Streamer Fly Tying and Fishing and look for a classic instead. I've always had good luck with marabou streamers, so the Ballou Special really jumped off the page when I first saw it. And it turns out that this was one of the first marabou streamers EVER. Seemed like a good choice.
But, of course, I couldn't leave well enough alone and had to muck around with the original. I will tie up some originals and see how my variant compares.
First, the tail. I wanted to use golden pheasant crest feathers but didn't have any. I tried a test pattern using the golden pheasant tippets and really liked the look, so I kept it that way.
As I mentioned in the tying instructions, using blue dun instead of white marabou seemed like another obvious choice. The original calls for two marabou feathers, but I prefer a much sparser fly and only used about one-third of a feather for each fly. More would probably be fine, but
I've been making an effort to keep my streamers sparse and I like the result.
The original, as you would expect, calls for jungle cock cheeks. I agree that the jungle cock makes the fly look much nicer, but in my limited experience I have yet to see a noticeable fish-catching benefit to the jungle cock. I thought about adding the cheaper fake jungle cock stick-ons, but don't really like them. The recipient is welcome to paint on some eyes if they wish. I meant these to be fishing flies and I concluded that cheeks/eyes weren't necessary. I am, however, open to suggestions to the contrary.
I have yet to try this pattern on the water so I'd be especially interested to hear how people fair with them this spring.
Millimagassett Smelt
Submitted By John Morrison

| Hook | Daiichi 2220 #4 - #6 |
| Thread | 8/0 Uni Thread, Black |
| Tail | 2 upturned golden pheasant crests |
| Body | Flat copper tinsel |
| Rib | Copper Wire |
| Wing | 1/3 Olive Bucktail as long as the tail, then 2/3 Orchid Bucktail, then 6 to 8 peacock herls with a golden phesant crest over all. |
| Throat | White schlappen tied beard-style |
| Head | Black with chartreuse or white eyes |
| (Optional) | A red stripe painted in the head area to immitate gills |
John Morrison's Comments On This Pattern
The Millimigassett Smelt was originally an unnamed bucktail first tied in the late 1960's by Mike Martinek. It proved to be a winner on several fly-in trips to northern Maine, and was subsequently named after a wild lake in that region.
The main feature of the fly is its copper body, "the third metal" as Mike calls it, very under-used on flies but a killer for brook trout and salmon. It gives a lifelike, subdued flash, ideal for dark water lakes. The Millimigassett Smelt is an excellent rainbow smelt immitation especially when fished close to shore.
When tying this pattern I found I was having a real hard time keeping the golden pheasant used for the topping aligned with the wing and the body. Then, I realized that it might look that way when dry but once it gets wet all of the colors blend together and everything seems to line up. Another thing that is important with this fly is to try to keep it sparse. The original pattern calls for white eyes and black pupils but I prefer the Witchcraft chartreuse eyes. This fly appears in Mike's book "Streamer Fly Patterns for Trolling and Casting" ,as well as Donald Wilson's book, "Smelt Fly Patterns" (Frank Amato Publications, 1997)
Magog Smelt
Submitted By Bob Petti

| Hook | Daiichi 2271, #2 |
| Thread | Danville 6/0, black |
| TAG | Oval Silver Tinsel |
| Tail | Teal |
| Body | Flat Silver Tinsel |
| Rib | Oval Silver Tinsel |
| Throat | Red Hackle Barbules |
| Wing | White, Yellow, and Lavender Bucktail |
| Topping | Peacock Herl |
| Cheeks | Teal Flank |
| Head | Black Thread |
Bob Petti's Comments
Magog Smelt
These were the first Magog Smelts I had ever tied. The inspiration to choose this pattern came from the sample included in S&A's "Flies for Atlantic Salmon". I thought that dressing was particularly handsome, so
I wanted to give it a try.
The key with this fly, and any fly with a tinsel body, is keeping as smooth an underbody as possible. I started my thread at the bend and wrapped back, bringing the tag tinsel with me. I wrapped the tag (long, like in S&A's book) and tied it off, tied in the tail, then secured the waste ends of both as I wound my thread slowly and carefully up the hook shank to the where the back of the head would be, finally trimming any left over waste from the tail/tag. Now I tied in the ribbing tinsel and slowly and carefully wound back to the tail, bringing the tinsel with me (everything gets tied on the bottom of the shank), making smooth touching wraps with untwisted thread. When I reached the tail, I wound a final layer of thread back to the hook eye, making every effort to keep this layer as smooth as possible, because the mylar tinsel is coming next. At the head, I tied in the mylar tinsel and wound it to the tail and back in touching, but not overlapping, turns, keeping constant tension on the tinsel to make it lay as flat, smooth, and tight as I possibly could.
The body was the hardest part of the fly, and took the most time. The thread I used was Danville 6/0. When untwisted, it lays super flat on the hook shank and is a real help when trying to keep a smooth underbody for any fly, whether it will be covered with tinsel or floss.
After the body was done, my next challenge was avoiding bulk in the wing. It's sounds silly, but it's hard to build a three layer bucktail wing without making it overly thick and bulky. Each layer feels like it's just a few hairs from the tail when you tie it in, and you'd swear it was not enough, but when all three are taken together, it looks full, yet not bulky. Getting each layer to "separate" so you can see each band of color was tricky, but a good strong "pinch and loop" did the trick.
The rest of the fly was pretty straightfoward.
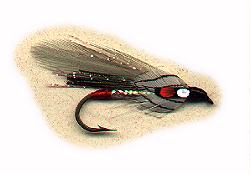
Fatal Attraction Smelt
Submitted By Bob Petti

| Hook | Mustad 36890, #4 |
| Thread | Danville 6/0, Black |
| Tail | Silver Flashabou |
| Body | Silver Diamondbraid ending w/ Red SLF |
| Hackle | White |
| Wing | Pearl Krystal Flash, Lavender Bucktail, Peacock Krystal Flash |
| Topping | Peacock herl |
| Head | Black Thread |
Bob Petti's Comments
Fatal Attraction (smelt)
The Fatal Attraction style was designed by Dan Blanton. He was looking for a new pattern to imitate salmon smolts when fishing the coastal rivers our west. The first he called "The Natural" which isn't a heck of a lot different than the one I submitted as a smelt. The first time I saw his fly was in the premier issue of "Fly Tyer" magazine. Something hit me, and I knew it would be a fish catcher. A black and orange version has been my number one salmon fly on the Lake Ontario tributaries the past couple of seasons.
Dan's Fatal Attraction is not so much a specific fly pattern, but rather a fly design which lends itself to infinite variation. Since I had already submitted one standard classic pattern for the swap, I wanted to
send in something a bit unique, so I chose to dress a Fatal Attraction in smelt-like colors. The only deviation from a standard Fatal Attraction is the bit of red dubbing at the front end of the body. It seems that a splash of red near the head of the fly is popular on many smelt patterns and I did not want to omit this detail from my fly, as I believe it's one of the triggers that will entice a fish to strike.
I believe the fly has two key design features. One is that long tail of flashabou, which Dan feels is a flyrodder's answer to a rotating spinner blade. I'm not completely convinced of that, but it sure does flutter and twinkle in the water like no other fly I've seen. The other unique design is the way the hackle and wing are tied. The hackle is tied in a full collar and the wing is tied immediately in front of this. I believe the little "bump" from the hackle keeps the wing up a bit and prevents it from fouling around the hook bend. I've fished the FA numerous times now, all with wings extending to the middle of the tail (well beyond the bend), and I've never had one foul. The fly fishes extremely well.
I think the silver body and tail, white hackle, and a sparkly lavender and herl wing will make a decent smelt pattern. If anyone hooks a fish with one, I'd sure appreciate knowing about it.
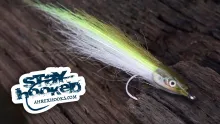
Rainbow Smelt Clouser Minnow
Submitted By Chris Quinn
| Hook | Mustad 9575 Size 4 |
| Thread | 8/0 Unithread dark grey & white |
| Eyes | Dumbbell Style Painted Silver w/Black Pupil |
| BELLY | White Bucktail |
| Wing | Pink Bucktail |
| GLITZ | Pearl Blue Krystal Flash |
| OVERWing | Peacock Herl |
Chris's Comments On This Pattern
Tying Instructions
1. Tie on, using the white thread and wrap a thread base, keeping in mind that the dumbell will be mounted on to about 1/3 of the shank length rearward of the eye. Allow sufficient space to tie down the materials ahead of the dumbbell eyes.
2. The dumbbell is mounted on top of the thread base. Hold it in position and secure it in place with several criss-cross wraps. Make sure it is squared off and secure in place with "Hard as Nails" or your favorite cement.
3. Cut a small amount of white bucktail, clean out shorties, and align tips. Tie it on in front of dumbbell and lock down with tight wraps.
4. Pass the thread underneath bucktail and take a series of wraps around the bucktail rearward of dumbbells. Cross back underneath towards eye and switch to black thread.
5. Turn the hook upside down in the vise. Cut a small amount of pink bucktail, clean out shorties, and align tips. Tie it on in front of dumbbell and lock down with tight wraps.
6. Tie in a small bunch of Krystal Flash, 8-10 fibers total. Trim butts and trim ends to the proper length in the rear.
7. Tie in 4-5 strands of peacock herl as an overwing.
8. Form head, whip-finish, and cement head.
Comments
The Clouser Minnow is a simple pattern which has been extremely effective on many species of fish for me. Small, largemouth, and striped bass, bluefish, flounder, chain pickeral, perch, crappie, and brown and brook trout have mistaken a Clouser Minnow for a baitfish. I have to admit that I have never caught a landlock salmon on a clouser, but then again I have never tried!!!! I am confident that a Clouser Minnow will be effective on landlocks.
Besides being a relatively simple fly to tie, the Clouser has several nice qualities about it. The fly is designed with lead eyes, therefore it sinks like a rock. This is a major drawback of most streamer flys in my opinion, they don't sink well! On a long leader, a Clouser Minnow can easily be fished 6 feet
deep in a river. You can also modify the sink rate of these flies by either changing the size of the lead eyes or by tying a sleeker or fuller fly. Therefore you can fish a wide range of depths by simply changing only the fly. You can fish in the surface film with ultra light lead eyes or even plastic eyes. You can fish on or near the bottom with heavy lead eyes. Or fish anywhere in between. One word of
caution : with the heavier lead eyes, keep your cast tilted. These flies hurt when they whack you in the back of the head!! Because the wing is sleek and the fly has lead eyes, this fly casts surprisingly well. If a good cast is made (often my problem) the fly will have a lot of momentum to pierce through the wind and turn over very nicely.
I hope everyone enjoys these flies. Any feedback is welcome.
Chris Quinn
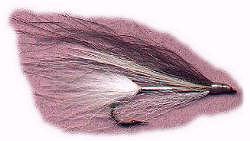
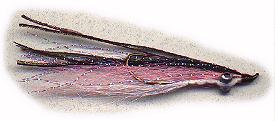
Grizzback Smelt (Dark)
Submitted By Bob Skehan

| Hook | Mustad 94720, size 6 |
| Thread | red 8/0 for rear, then black 6/0 for front |
| Tail | Equal bunches of yellow, then red, then black hackle barbules. |
| Body | Silver Braided Mylar, secured with red thread. |
| Throat | Equal bunches of black, then red, then yellow hackle barbules. |
| Underwing | Sparse white calftail, over which are two strands of pink crystal flash, over which are two strands of purple crystal flash. |
| Wing | Two grizzly saddle hackles, flanked by two black saddle hackles. |
| Shoulders | Jungle cock body feathers |
Bob's Comments On This Pattern
A dark-barred smelt pattern which I created that merges some of the best features of a variety of proven patterns.
The combination of the black and grizzly hackles for the wings provide the patterning of the backs of smelts found in certain waters here in Maine.
Pink and Purple Crystal Flash to add a bit of spark, and provide a hint of the coloration found on the smelt near the lateral line.
Silver braided mylar tubing for the body, secured with red thread in the back....very fishy looking material for streamer bodies, and I like patterns with red thread near the "ventral" area of a baitfish pattern.
Jungle Cock body feathers as shoulders provide an indication of a gill plate.
I've also tied this pattern using white or blue dun hackles flanking the grizzly. This version of the pattern is the Grizzback Smelt (Light)
Cayuga Lake Smelt
Submitted By Blake Werner

| Hook | Streamer, size 4-6 |
| Thread | White |
| Body | White wool |
| Rib | Flat silver tinsel, appropriate for hook guage |
| TailING | White opauque fish hair, finest guage. |
| Wing | White polar bear hair, sparse, length out to tailing, over which a bunch of gray McFlylon, over which 4 strands pearl flashabou, over which sparse, long white bucktail with a couple brown hairs allowed to stay in. |
| Topping | 4 tips of green peacock herl |
| Head | Whip finished, and top half colored with a black sharpie. |
Blake's Comments On This Pattern
My original dressing used a grey craft fur in the wing which is no longer available. I now use a product called McFlylon, which is a new product for me. I was given a bit as a demo a couple of years ago. This shade is called olive but has a gray cast when dry. It's fine, soft-fibered, but long. I figured it would be good for salt, but it's too soft.
Instead of the white thread called for in the pattern, I used 8/0 Rusty Dun. I recommend a small thread to keep the head proportional.
I use one strand of Pearl Flashabou in this pattern, cut in half, then doubled over to make 4 pieces.
The sparse long bucktail with the brown hairs left in are obtained by splitting the tail down the center and cutting the hairs from the center edge.
No glue was used in this fly.
- Log in to post comments