
Slinky Shrimp

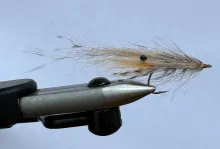
A shrimp pattern can be either a caricature or an imitation. The Slinky Shrimp falls somewhere in between

No comments yet
Translucent
Translucent
Nick Thomas

I have a confession to make. I’m a bit obsessed with tying shrimps. There something about their simplicity coupled with their effectiveness that keeps me devising new methods for imitating the little critters. There’s lots of scope, a shrimp pattern can be either a caricature or an imitation. I’m not sure hungry fish care either way, so you can go simple or complex, easy or hard, whatever takes your fancy.

At its simplest tying a shrimp can be just a matter of dubbing a hook and then pulling a material over the top to represent the shell back. A rib may be added to segment the shell and hold it in place and modern UV-resins give a lot of scope for building simple or complex shells.

The segmented transparent shell back
Nick Thomas

My book Fly Couture contains a number of different shrimp designs using natural and synthetic materials.

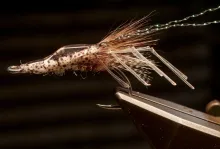
The Slinky Shrimp is tied using a pre-prepared shell formed by winding vinyl body glass and tinsel over hollow braid held on a sewing needle. The process is a variation of the technique I use to tie the body for my Skin & Foam Pupa and Stealth Stonefly.

Tying the shrimp this way creates a segmented translucent shell just like the real thing. It also removes the hassle of winding a wire or monofilament rib through the underlying legs without trapping them, something that I find can be a bit of a pain to do.


When you tie the shell make it about one centimetre longer than required for the back of the shrimp on your chosen hook size. This will allow you to tie it in and cut off the front end in front of the hook eye, unravel the braid and the two ends of body glass and then trim them individually so you can finish with a neat head.

Finished shell
Finished shell
Nick Thomas
Two Slinky Shrimps
Two Slinky Shrimps
Nick Thomas

Slinky Shrimp

A cress bug with a spiraled spine

Scud fly
Nick Thomas
grayling
rainbow trout (landlocked)
Hook Fasna F-120 #12/14
Thread 12/0 to match dubbing
Shell Hends micro body glass and UTC opal mirage tinsel wrapped over hollow braid
Legs Squirrel dubbing
Finish UV resin and varnish

Preparing the "spring" for the shell

  1. Lock a needle in your vice and slide on a piece of hollow braid.
  2. Run on the tying thread and catch in a piece of body glass with the flat side against the braid. Tie down the body glass back towards the vice jaws.
  3. Tie in a piece of tinsel, wind forward in overlapping turns and tie in.
  4. Wind the body glass forward in touching turns and tie in.
  5. Whip finish and slide the completed shell back off the needle.

Tying the fly

  1. Tie in the shell back at the bend of the hook, bind down the braid up the hook shank and trim off the waste with an angled cut.
  2. Take the thread back to the base of the shell back and dub the legs. Brush the dubbing down on both sides of the hook.
  3. Pull the shell back forward and tie in with tight thread wraps between two of the body segments. Secure the thread with a half hitch or whip finish.
  4. Cut through the shell back in front of the hook eye and unravel the ends. Pull each one taught and trim.
  5. Bind down the cut ends, build a neat tapered head, whip finish and cut the thread.
  6. Apply some UV-resin along the back of the shell, cure the resin and then varnish the shell and head.
Medium
Shrimp Couture
Nick Thomas

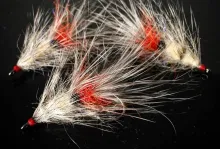
Body glass comes in a wide range of colours so you can tie variants in natural shades, or you can use the pink, orange or red stuff to tie up bright blingy ones for winter grayling. Having said that I generally find that they are just a happy as trout to take a natural looking shrimp.

A grayling took it
A grayling took it
Nick Thomas

Since you got this far …


The GFF money box

… I have a small favor to ask.

Long story short

Support the Global FlyFisher through several different channels, including PayPal.

Long story longer

The Global FlyFisher has been online since the mid-90's and has been free to access for everybody since day one – and will stay free for as long as I run it.
But that doesn't mean that it's free to run.
It costs money to drive a large site like this.
See more details about what you can do to help in this blog post.

The Global FlyFisher has recently been updated to a new publishing system, and there may be a few glitches while the last bits get fixed. If you meet anything that doesn't work, please let me know.
Martin - martin@globalflyfisher.com