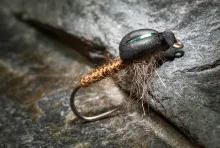
You may not have noticed at a first glance, but this detached body stonefly imitation is tied on a jig hook, a long shank #14 jig hook to be precise. Why? Because it’s designed to be a dual-purpose fly.
Firstly, it can be fished as a conventional dry fly. I tie many of my dry flies on jig hooks as the angled front of the hook pushes the hook eye and therefore the knot and the tippet near the fly under the surface when the fly lands. No tippet sitting in the surface film glinting in the sunlight to spook the fish. Very sneaky and stealthy. Secondly, dry flies tied on jig hooks are ideal for using as indicators, but we’ll come to that a bit later.
The fly’s name comes from the way the fluorescent pink sighter is attached. Rather than being tied in on top of the thorax, the pink yarn is pulled up through a small hole in the foam thorax cover. The bright sighter allows the fly to be easily seen at a distance or in rough water but is concealed from fish looking up from below.
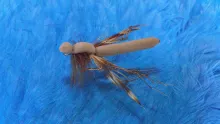
From beneath
Nick Thomas
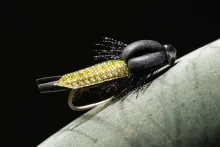
The segmented foam body is constructed on a foundation of hollow braid held on a needle.
Braided monofilament fly line backing is ideal for the job and is easily threaded onto a needle by alternatively pushing the braid over the point and then sliding the compressed braid back.
extended body
Nick Thomas
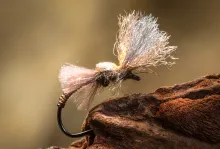
Slim profile Nick Thomas
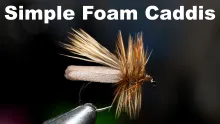
Stealth Stonefly
A dual purpose stonefly pattern tied on a jig hook. See the article for more details.
Dry fly
Nick Thomas
brown trout
rainbow trout (landlocked)
Materials
Hook
Fulling Mill FM51 30 #14
Thread
12/0 black
Detached body
1mm black foam on hollow braid
Wing
Semperfli iron blue poly-yarn and 6mm black organza ribbon
Thorax
Black vicuna dubbing
Sighter
Semperfli pink poly-yarn
Thorax cover
2mm black foam
Tying the extended body 1. Cut a 3mm wide strip of thin foam. 2. Insert the needle into the braid and feed the braid along the needle. The end will fray a little at the start, but this end will be cut off later. Once the needle is covered cut the braid leaving about 25mm/1 inch free at the point. Lock the eye of the needle in your vice. 3. Run the tying thread onto the braid in front of the frayed section of braid, make a whip finish leaving a long tag end of thread. 4. Tie in a strip of 1mm foam on top of the braid and tie it down towards the needle point for the desired length of the body tying in the thread tag from the whip finish at the same time. 5. Stretch the foam and wind in overlapping turns to form the body. Tie in and trim off the waste foam. 6. Make a final whip finish and cut the thread leaving a long tag. 7. Slide the body off the needle, trim the frayed braid at the back of the body close to the foam and melt the end near a flame.
Tying the fly 1. Run the thread on at the jig angle and trim off the tag end. 2. Take the thread halfway down the shank in touching turns and tie in the foam body. Trim off the waste foam, braid and thread ends and add further thread turns to secure the body in place. Add a dab of superglue onto the thread wraps. 3. Tie in a length of poly-yarn over the body, trim with a tapered cut and cover the cut ends with thread wraps. 4. Cut a length of 6mm organza ribbon, trim one end to a point and hold the cut edges near a flame to fuse the fibres. Tie in over the wing fibres and remove the waste end. 5. Cut a 4mm wide strip of 2mm foam and use a hole punch or a craft knife to cut a hole in the centre. Tie in hanging back over the wing such that when folded forward the hole sits towards the front of the thorax. 6. Take a length of pink poly-yarn, fold it in half and tie in the ends forming a loop above the thorax. 7. Dub the thorax behind and in front of the pink yarn. 8. Take a length of wire and push one end through the loop of yarn. Fold the wire, thread both ends through the hole in the foam and pull the yarn loop through. Remove the wire. 9. Hold the end of the yarn loop, fold the foam forward and tie in at the jig angle. Smear the thread with varnish, whip finish and cut the thread. 10. Trim the pink yarn to length to form the sighter and trim the foam to form the head.
Easy
As an indicator
Nick Thomas
So now you’ve tied one, how do you use it as an indicator with a nymph underneath in a duo?
It’s simple, and very effective too. Tie the stonefly to the tippet at the end of your leader and then tie the tippet to your nymph to the eye of the hook below the leader knot. In contrast to the New Zealand method the nymph link does not interfere with fish taking the dry fly and cannot slip off the bend. It is also, unlike tying the dry fly on a dropper, easy to change the depth of the nymph simply by making the nymph link longer or shorter. For faster changes carry a couple of nymphs tied to different lengths of tipped ready to swap when the water gets deeper or shallower.
The version I tie is 3 centimeters/1.2 inches long overall which is just fine for fishing my rivers. In the UK the imaginatively named common medium stonefly is 3 centimeters long. However, if you fish elsewhere in the world there are some 3,500 species of stoneflies of different sizes which you can imitate by scaling up or scaling down the same pattern. You may be fortunate to fish the rivers of the western US where the giant stoneflies or salmon flies hang out and are 80 millimeters/3 inches or bigger. In that case you’re gonna need a bigger hook.
The Global FlyFisher has been online since the mid-90's and has been free to access for everybody since day one – and will stay free for as long as I run it.
But that doesn't mean that it's free to run.
It costs money to drive a large site like this. See more details about what you can do to help in this blog post.