In this article Romanian leather artist Remus Stanescu takes you through the process of making one of his beautiful leather fly boxes.

In this article I would like to show how a leather fly box is made, especially my methods used in the process.
But first I think I should start with a little introduction about what Stanescu Leathercraft is.
Stanescu Leathercraft is a small family business based in Transylvania, Romania. The only staff members is my wife Catalina and me.
My name is Remus Stanescu and my dream has always been to make a living doing something fishing related. Since my first job, where I was processing photographs for funeral stones (depressing times) till now, including the 10 years spent in the gaming industry as a 3D graphic artist, this has remained my dream. I wanted to do something special. My first thought was to build fly fishing reels but the high level of technology involved made me change my mind. I wanted to do something more basic.
My brother came up with the idea, showing me some leather products related to fly fishing. Then I found out that my father-in-law had been running a leather workshop in the past. So together with my wife I channeled all our efforts to have this dream fulfilled.
Stanescu Leathercraft represents what I find most precious. The best memories from my childhood, my days and nights spent fishing with my family, and as for my wife the time she had spent as a child in her father's leather shop.
The first ingredient in creating a fly box is the leather. After long and careful research we chose to collaborate with a tannery in Tuscany, Italy, a place with a great tradition in tanning. The leather I used is the vegetable tanned leather. So, we will use 2.5 mm thick leather for the main body of the box and 1.5 mm thick for gussets and other parts.

After choosing a nice piece of leather and tracing the pattern on it, I start cutting the pattern. Any deviation from the pattern line can lead to errors in the final part of the project. One of the worst cases is that the box will not close properly.

Once the main body is cut, the next step is to transfer the drawing on the leather prior to the carving process.
The leather must be adequately watered and wet and the transfer of the drawing will be done with the tracing paper. Next step is cutting the important lines for the carving. Volume is added with a special knife.
A thing not to be neglected is the sewing groove which offers wear protection.

Carving the drawing is like a bas-relief or wood carving, the difference being that instead of the chisels I use special stamps which do not remove the material but it compress it. Once the leather is dried the carving is done.

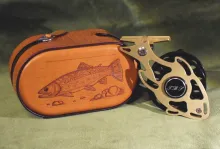
For making the trout motif more visible I used a stamp which mimics the aquatic environment.

After carving the trout, I cut the other parts of the box out of 1.5 mm thick leather. The next step is dyeing. The dye I use is Fiebing's, one of great tradition in USA, produced since 1895. The painting technique here is called "sunburst" and is also used in painting guitars bodies.
After dyeing I apply several special treatments to the leather for hydration and waterproofing.

Normally I use black suede for the insides for a more noble and elegant look.

Next step is marking the stitching holes. The Japanese steel always does its job!

Next I will do the gussets. Once dyed it will be glued and sewed.
Sewing with 2 needles gives the box a long life and a beautiful look. The big difference between hand sewing and machine sewing is the thread behavior in case of cutting. In case of hand sewing the thread does not unravel like the machine sewing does.
The thread I use is made of 1 mm waxed polyester.

Once the gussets are stitched the parts will be glued together.

After gluing the parts together, the next step is punching the holes for the final sewing. But before all, for best results we need to sharpen the awl on a water stone. 10 minutes of sharpening can spare you of unpleasant results.

Sewing by hand is beautiful and long lasting! And relaxing... for me at least...

Once the sewing is done the next step is trimming and dyeing the edges for good final look. Again, Fiebing's dyes are used for a distinct edge.

After this I waterproof the edges with a mix of bees and carnauba wax.

Besides waterproofing the beeswax confers a nice gloss of the edges.
Next I put the lock on it. I always use simple things which can be easily replaced. I don't use rivets, zippers, snaps or others. They are the weakest part in a handmade because they break first and cannot be replaced.

In the final part of my project I choose to put self adhesive foam stripes for the flies. It can be replaced anytime if broken. Also I can use fur for streamers or special holders for tube flies.

The best part when making a handmade project is that every resulted product is an unique one. I can't make two identical items even if I want to. While working there can be little "accidents" but these gives a high value of our work showing that it’s a hand made and not a series work.
And finally the most important ingredients in making a leather object with a precious look are time and wear. This gives patina and uniqueness, pleasant aesthetics and creates a strong bond between the product and its owner.
This case can be customized with name initials, logos, etc.

Contact
Remus Stanescu can be reached here:
Web site: stanesculeathercraft.com - the site is unfortunately offline
Mail: stanescu.remus@gmail.com
Facebook: Remustanescu
The price for a handmade, custom leather flybox starts at 150 Euros.
- Log in to post comments