
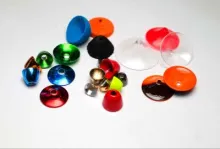
A brand new way of tying tube flies. The usual way of weighting a tube fly is by using copper or aluminum tubes. This article shows a totally different approach


Once in a while I read about a fly that I think looks like a killer and I tie it and try it. Usually I don't have any more success than with my standard patterns. This has happened to me several times but I never give up trying new patterns (does this sound familiar?). So when I read about the Cone Head Tube Fly in an article written by Mikael Frödin - a superb Swedish flytyer - I thought as usual: "This does look interesting".
I went to my local flyshop and got the cone-heads and tied up a few flies in different sizes.
The first trip to the river I got nothing...

The next trip I got three salmon in less than 90 minutes...
No surprise that I felt that this was a special fly, and even if there where several far more experienced fishers in the river, I was the only one that got any fish. After an exciting trip like this I just couldn't use any other fly.
So what's making this fly so different from other tube flies?
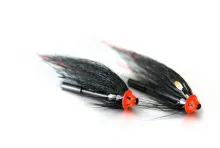
Of course it's the head. By using a metal cone head you will eliminate the weight of the treble or double hook and the fly will have a jig-like motion when you retrieve it (depending on the current). In strong currents you'll have a fly that hardly ever drags. So the cone head give you "new" behaviors both in strong currents and slow waters.
If you know how to make a tube fly you know how to make a Cone Head fly.
The tricky part is getting the inner tube to fit in the hole in the heads. I first used a paper knife to "peel" off some off the plastic to make the front part thin enough to insert it through the head, now I use a 2mm drill to widen the opening a little.
When you have inserted the inner tube well through the head, you must melt the protruding part down towards the head, making a plastic cuff. This will prevent the head to slip off the tube. Use a lighter or a candle and rotate the tube while putting the head close to the flame. Be careful: Don't get to close to the flame as it can catch fire or melt too much. Also make sure that the inner tube isn't clogged by melted plastic. If this happens, you can use a bodkin to open up the inner tube.
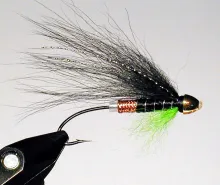
Insert the inner tube in the outer tube before you tie the fly. If you tie the fly on the outer tube first you will probably have difficulties inserting the inner tube due to the compression of the tube that the tying-thread makes. You can use you favourite pattern with this type of fly. I prefer using a short tube (2 cm or 3/4") and rather short wing (about 4 cm or 1½"). This makes a small fly that will take most benefit from the weight of cone head. It will dive and jig when you wiggle your rod tip or retrieve with short pulls.
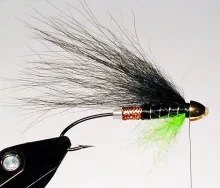
Materials for my favorite:
Tube: 2 cm, 1½"
Rear 1/3: Copper Mylar tubing
Front 2/3: Black floss and silver rib
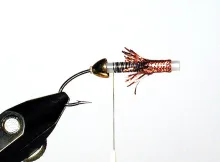
Throat: Green fox (sparse)
Wing: Black fox and a couple of strands of flash.
Tying sequence for my favorite:
- Insert the tube with the head to the left (I use a salmon hook without eye), wind the thread to the point where you will tie in the copper tubing and go back towards the head.
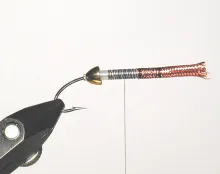
Insert the copper tubing and secure it well with tight windings. - With your fingers carefully roll the copper tubing towards the head. It's easy to get into trouble here because the mylar tube tends to get unravelled (as you can see in the picture above) when you turn roll it on the tube.
- You can cut some of the excessive copper strands but I tie them all down. This might give you a bulky body but will secure the copper very well.
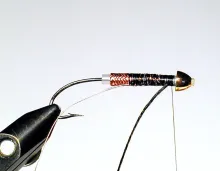
- Now that you have secured the tubing you can set the tube back in the vise the "right way".
- Tie in oval silver tinsel for ribbing and black or charcoal floss silk for body.
Tie in green fox for throat (keep it sparse) and black fox for wing. - Tie in a strand of flash on each side of the wing. To get a smooth joint between the large copper head and the body of the fly, it might be an idea to wind the tying thread until you have smoothed it out (remember that the varnish will build up some).
- Whip finish.
- Varnish.
- Log in to post comments


Gary, Check out <
Gary,
Check out some of our more recent articles on tube flies, which explain the way you can combine outer, inner and junction tube.
Martin
do you need an inner
do you need an inner tube or use a junction tube at the end of the fly
Q. When the smaller
Q. When the smaller tube is inserted into the larger tube (prior to tying), is there some sort of cement that is used to secure the inner tube within the larger one?
A well written artic
A well written article which opens up many possibilities and as often happens, sends the imagination of anglers racing!
A Nice Fly I will ti
A Nice Fly I will tie one and try it on our River. The river Erme in the South West of the U.K.
P.M ( Membership Sec of Cleeve Angling Club Of Ivybridge )
I am very interested
I am very interested in the tubing used for this innovation - who can market the 'tubes' and where will I get them?