
Colombian Carlos Heinsohn ties a neat baitfish pattern made of synthetic fibers. It's a tough fly with nice movement designed for any predator which feeds on smaller fish. The pattern is more a tying principle than a specific pattern.

This is a baitfish pattern made of synthetic fibers, a tough fly with nice movement designed for any predator which feeds on smaller fish. This is an easy tying fly once you understand the way it is constructed, and with a little practice it becomes almost automatic and you will tie it in a few minutes.
The Chino arrives at its third generation after some functional and esthetic changes given after many years of fishing and a lot of fish landed. When I started thinking about the way the fly should be tied, I was looking for a fly that really imitates the shape of a baitfish, mostly in the head that should be wide enough with no bulky knots in front of it.
The earliest Chinos were something difficult to tie because I used to tie the body fibers on the hook pointing forward all the way through the eye of the hook and then pulled back to be glued with epoxy to build a wide head (All the saltwater baitfish patterns we see today weren’t invented yet) . Not all the Chinos of the first generation were as finely finished as the one shown.
Four years ago the Chino grows to its second generation when I saw that I could tie the synthetic fibers backwards keeping a wide shape, and I could tie the head with other fibers than the body ones.
This third generation of Chinos have some innovations on proportions, on the weight, in the way of tying the head and some basic conceptions that has been improving it through the years.


It is helpful before beginning to tie to take note of three things we should remember if we want to get the fly as we want it:
1.
The Chino is a fly made of wavy synthetic hair, tied by layers over and under the hook shank. The profile of the fly should be high, tapered and flat on the sides.
2.
Pick less hair than you want for every bunch of synthetic hair, otherwise the fly will not keep its shape. Bunches should be really tapered at the base and very thin at the end.
3.
Any fly made of synthetic hair will not change its profile in the water, so the shape of the finished fly on your vise will be the same of the fly when you fish it. If you tie the Chino with thick synthetic hair bunches the fly will keep a square profile instead of a minnow shape.
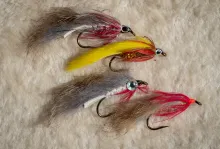
We are going to tie a relatively large Chino of approximately 12 cm. on red and yellow.


THE RECIPE
STEP 1: THE HOOK
For this moderate big Chino we are going to tie on a Gamakatsu B10S #2/0, a short shank hook. It can be tied also on standard shank saltwater hooks like Mustad 34007, but being careful of start tying the tail at the end of the shank so it will not tangle with the gap while fishing. Start tying the thread behind the hook eye and wrap a thread base back to the end of the shank.

STEP 2: LEAD WIRE
For a better swimming action wrap a strip of lead wire on the shank leaving a free space of ½ cm against the eye of the hook. Apply a small drop of fast drying Cyanoacrylate (Zap a Gap) over the thread.

STEP 3: TAIL
Start tying the tail at the end of the shank, a bunch of yellow fibers which determines the length of the fly, 2 ½ to 3 times the length of the hook. In this case we use Fuzzy Fiber that is quite light and gives great volume to the body. Tie three or four flashabou strands over and under the tail surpassing it for one centimeter. Do the same with a few strands of Krystal Flash.

STEP 4: FIRST PART OF THE BODY
Just in front of the point the tail is attached, tie a bunch of yellow fibers on the top and a bunch of yellow fibers on the bottom.

STEP 5: MORE FLASH
Tie three or four Flashabou strands over and under the fibers of step 5. Do the same with Krystal Flash.

STEP 6: SECOND PART OF THE BODY
Just in front of that point, tie a bunch of yellow fibers over and a bunch of yellow fibers under the shank.

STEP 7: THIRD PART OF THE BODY
Now we are at ½ cm to the hook eye. Over the same knot, tie a bunch of red fibers on top and a bunch of red fibers below.

STEP 8: HIDE THE THREAD
In the same point, tie a short thin bunch of yellow fibers at each side of the shank to hide thread and knots. Put a small drop of Cyanoacrylate to this knot to secure the whole body. Now we have finished the body, so we can see the main shape of the fly before starting to tie the head.

STEP 9: UPPER HEAD
Cut a 2 cm. long bunch of red fibers and tie them over the shank on the free space we leave against the eye of the hook. Assure it with two or three wraps of thread.

STEP 10: LOWER HEAD
Cut a 2 cm. long bunch of red fibers and tie them under the shank on the free space we leave against the eye of the hook. Fasten it with two or three wraps of thread.

STEP 11: TOPPING
On top of the “open” head, tie a long bunch of red fibers as shown on step 7. Secure it with four tight turns of thread.


STEP 12: THREAD TO THE EYE
With your left hand grab the fibers that were tied forward and pull them backwards. Pass the thread forward and secure it with two or three turns over the shank just at the eye of the hook. You can make a whip finish knot, but two overhand knots are enough due to the Cyanoacrylate you are going to set on the head.

STEP 13: FINISHED UPPER HEAD
With your left hand’s index and thumb grab the fibers of the upper side of the head, taking care of give it a flat shape. Apply a drop of CA in the point where they turn backwards, being careful to not glue the lower part of the head or your fingers. Keep the head pressed for 5 seconds while the glue is cured.

STEP 14: FINISHED LOWER HEAD
Turn the fly upside down and repeat the previous step with the remaining fibers on the bottom of the fly.

STEP 15: TRIM HEAD
Trim any excess of fibers with serrated scissors to give the head the shape you want. At this time the fly already has its final form.


STEP 16: SEXY EYES
Put a small amount of 5 minute clear epoxy to the sides of the head, and when it begins to harden, place the eyes and press them with your fingers or a little clamp until epoxy us fully cured.


And the fly is finished!


TIP: WATCH THE SHAPE
If your chino has a square profile once you finish it, it is because the layers you tied were too thick. You can obtain the right profile of the fly by carefully cutting each color section, but first you must “open” the fly to identify each bunch. Remember to keep layers smoothly tapered.
ANOTHER TIP: TAKE A BATH BEFORE MAKEUP
If you are going to paint lines or dots on your fly, you can bring the fly “a massage" under the tap water flow so the fibers of the different layers get organized at their final position and then you can paint sharp and well defined stripes.


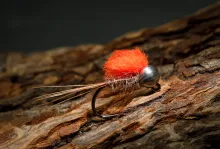
Chinos can imitate almost any baitfish just matching colors or adding more sparkle material. It is also a good atractor pattern if you tie it on other color variations.
It has been widely tested on saltwater inshore fishing, tropical rivers and lakes with success. Here with an 18 lb. Peacock Bass on a huge “firetiger” Chino.
You can tie Chinos of every size, from a #8 to a #5/0 hook.
There are hundreds of variations. Try different color combinations and different sizes for your favorite fish.
Enjoy it!


- Log in to post comments

a. markowitz,
The
a. markowitz,
There was an error in the file naming of the images. It's been corrected now, and all images should show as they are supposed to.
Martin
Not surprising to se
Not surprising to see that big peacock. This pattern is ideal for those. I'm going to feed it to our smaller peacocks in Florida.
OK, I get it: click
OK, I get it: click on the blank box to see the photo.
Carlos, the photos d
Carlos, the photos do not appear on the Chinos page. Just blank boxes where the pix belong.
yes yes!! Fly Fishin
yes yes!! Fly Fishing mosqueo (Facebook) tropical is really proud of you!! good to see you creating new models, being a crazy tyier
great pattern. Carlo
great pattern. Carlos was kind enough to give me a couple and they are awesome. big profile light to casta and effective. What else can you ask for???
Carlos is a chinaso!!!
jose malagon
excelent pattern , c
excelent pattern , carlos , we need to go out and fish them.
Hey Carlos,
Didn't
Hey Carlos,
Didn't you have any problems with this material when the fly is wet? In my experience these synthetics rolls over the hook when tied both on the up and down side of the hook body.
Thank you guys for y
Thank you guys for your kind words!
nice ! thanks for sh
nice ! thanks for sharing and good luck with them. I will do some for Dorado s fishing !
Hey Calros, great pa
Hey Calros, great pattern, just waiting for Dicember to go to Colombia and give it a try, thanks for sharing..
Chao David
These flies are grea
These flies are great I am going to ty a few for my next outing
great tie that thank
great tie that thanks for sharing
Carlos
Indeed...tha
Carlos
Indeed...that should work for our " Lake Beautys"
nicely done !
Saludos Heiko
synthetics and baitfish flies
To avoid roll over of synthetics, I tie in a few long strands of deer tail hair at the end of the shank.