
If you think that a tube for a tube fly is a cylindrical piece of plastic, then you are in for a surprise. This article will present more tube styles than most fly tyers ever imagined, and probably teach even seasoned tubers a thing or two.

 and a plastic cylinder (right). The visual differences are small: the translucent vs. the shiny tube and the smaller head on the bottle, and there\'s a difference in weight too of course.")


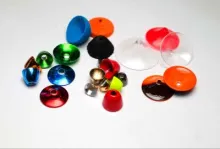
There are an increasing number of different tube styles, but they basically come in two groups:
- cylindrical tubes
- bottle tubes
Cylindrical tubes are straight tubes with a uniform diameter, while bottles - as the name implies - are bottle-shaped, meaning with varying diameter over their length.
They all vary in material, length and weight and the bottle shaped ones vary significantly in shape, and - to confuse matters further - sometimes come as something very far from a bottle-shape and even as straight cylinders, still referred to as "bottles" (sic!).
Material
As also indicated several times already, there are a number of different materials used for both tubes and bottles. Straight tubes come in different plastics, aluminum, copper, brass and even steel, while bottles come in aluminum, brass, tungsten and sometimes plastic.
Weight and stiffness of the different tubes can be changed by changing material, diameter, wall thickness and of course length. Several tubes can also be combined in some flies, which are tied on several tubes of varying shape, material, color and diameter joined with super-glue or through the use or melted collars, sometimes combined with cone heads.
So as you can see there are lots of factors, which can influence the weight, shape and size of your finished fly. Below you see a couple of tables trying to roughly outline the relation between tube type, tube size, material and the fly you want to tie. This is just meant as a guidance and a help to people trying to get into tube fly tying. The variation is endless, and there is no final answer to the question of what tube to use for what fly.
Lined and unlined
Some tubes will require a liner. The liner is a thin plastic tube, which is mounted on the inside of the thicker tube. The liner has one primary purpose: to protect the tippet against the sharp edges of the outer tube. From this you can also deduct that most plastic tubes need no liner. They are mostly made from a material, which is softer than the tippet, and will not be able to harm it.
A few metal tubes come with flanges on the ends and a polished inside. These won't require any liner either.
But all other metal tubes will call for a thinner and softer inside tube. Some come with such a tube already mounted, some come with a length provided for you to cut and mount and some just come au naturel in which case you will have to find a suitable thin tube to use.
When using cones, the liner will sometimes get the important second job of holding the cone, but more on that later.

|
|
|
|
|
|


Liner and inner tubes
Once you start fooling around with liners, inner tubes and cone heads you will realize that tubes come in a confusing wealth of inner and outer diameters. And the thin tubes also come in different stiffnesses.
If you want to tie your flies on the inner tube - like in the rear tube style of flies - you will need some rigid inner tubing. Cone heads mounted tightly in front of ordinary tubes or bottles, where the fly is tied on the main tube or bottle, need not be as rigid, even though it can be with no harm done. For plain lining of any type of tube, any type of plastic will do as long as it melts and curls up nicely. Some manufacturers provide colored inner tubes, which enable you to add color to translucent or semi-translucent outer tubes.
The safest way of getting the best result is to buy kits or tubes from systems, where the tubes are matched in the package. Swedish Guideline's FITS (Frödin Improved Tube System) is such a system of tubes in different diameters, which are made to fit nicely together.
Second best is bringing your tubes and cones to the dealer and test the diameters before buying.
 unlined, b) plastic with linier, c) colored plastic with colored liner, d) lined brass, e) polished brass, f) rear tube with liner/inner tube and g) a bottle with liner. To the right the process of lining: 1) burn a rear collar, 2) mount the liner, 3) pull tight, 4) trim and 5) burn a front collar.")
|
|
|
|
|
|
|
|


 or 3 inches (light).")


You can easily skip these tables if you just want to continue with the basic intro to tubes.
| Material, shape and other factors | |||||
| Material | Shape | Price | Weight | Liner needed* | |
| Plastic | Straight | Low | Light | No | |
| Aluminum | Straight | Medium | Medium | Yes | |
| Copper | Straight | Medium | Heavy | Yes | |
| Brass | Straight | Medium | Heavy | Yes | |
| Steel | Straight | Medium | Heavy | Yes | |
| Aluminum bottles | Tapered | High | Medium | Yes | |
| Brass bottles | Tapered | High | Heavy | Yes | |
| Tungsten bottles | Tapered | Very high | Very heavy | Yes | |
* Some metal tubes are polished on the inside, which means that a liner may not be needed.
|
|
|
|


| Suggestions for tube material and shape depending on the fly size and weight | |||||
| Fly size | Tube length | Light | Neutral | Heavy | Very heavy |
| Small | 1 cm | Plastic | Aluminum | Brass bottle | Tungsten bottle |
| Medium | 2.5 cm | Plastic | Aluminum | Aluminum bottle | Brass bottle |
| Large | 5 cm | Plastic | Aluminum | Copper tube | Brass tube |
| Very large | >5 cm | Plastic | Plastic | Aluminum | N/A |
|
|
|
|
|
|
|
|


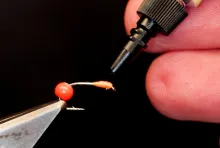
Preparing a tube
Almost all tubes need a little work before you can tie on them. If you buy your tubes in precut lengths, you may need to line them or to melt collars on them. You need a flame for both jobs - a candle or a lighter will do.
You will usually only melt a collar on the front part of plastic tubes. Some tyers like a rear collar, but it's not necessary. The front collar is there to keep the head wraps in place. The rear of the fly is usually left bare to adapt a junction tube, so no need for a collar there.
Hold the tube close to the flame and let the rim melt and curl slightly while you rotate the tube. Remove the tube from the flame and let the collar set. You are ready to tie.
Lining is done with the same basic technique. Melt a small collar on the liner and pull it taught to the rear of the tube or bottle. Depending on your tying style, you now need to trim the liner and melt a similar collar in the front end. Let about 2 millimetres or 8/10 of an inch protrude, and melt this so that it curls back tightly against the tube. If you are mounting a cone after the fly is finished, leave a length of inner tube or liner to tie on. More on this subject in the next article.
Some tyers like to have the mandrel from the tube fly holder inside the thin tube while melting. This keeps the hole from closing.
|
|
|
|
|
|
|
|
 and finish the fly with a cone.")


|
|
|
|
|
|


Tying on tubes
One thing you will notice about almost any type of tube is that your use of tying thread will increase. The sheer diameter of the tube means that you use more thread. The same goes for tinsels, yarns, body hackles etc.
Hackles can sometimes be a surprise, and you have to remember that hackles on tubes need to be longer than hackles for hooks.
You will also notice that flies - not surprisingly - tend to become thick in the body. You have no way of slimming down the body smaller than the diameter of the tube. Certain bottle style tubes kind of defy this rule because you tie on the thin inner tube rather than the large-diameter outer tube or bottle, but I will cover them later.
You will also notice that tubes are easier to tie on on many respects. Getting wings to ride nicely on top of a fly is easy. Sides or cheeks can be mounted precisely and false hackles and even hackles that go all around the body tend to behave nicer than on small diameter hook shanks.
Tube bodies
You can finish the body of a tube fly as you would any other fly body: dubbed, using yarn, with tinsel and rib or however you prefer. But tube fly tyers have cast their love upon some less traditional bodies, of which the most radical is no body!
With modern tubes available in many colors - anodized and painted metal as well as colorful and semi translucent plastic - there is little reason to cover their surface with a body, and the bare tube is a hallmark of many modern tube flies. You can find a wealth of colors and even find colored tubes with flakes of shining material embedded in the tube material itself, referred to as FlecTube.
A commonly seen style is the straight or inversed mylar tube. This consists of a piece of mylar tube tied over the tube - if reversend then it's tied to the rear of the tube pointing towards the rear and then inversed up over the front of the tube, turning it inside out. This secures the tie-in spot of the material under itself and saves you covering the fraying butts of the mylar tube in the rear of the fly.
Building up bodies from glue or other fluid body materials is also a technique, which is popular on many saltwater flies. The tube enables you to add volume to the body easily and building up lifelike bodies for forage fish imitations can be easier on tubes than directly on a hook.
A classical ribbed tinsel body lends itself very well to tube flies. Just remember to be generous with the tinsel and the ribbing, because a tube can really consume some material, particularly if you cover the tube with two layers of flat tinsel.
There will be much more on the subject of tying techniques in Tube Tying Techniques. But the next logical step in learning about tube flies may be studying the tube tools needed.


- Log in to post comments

Christophe, Thank
Christophe,
Thanks for your comment!
The inner tubing is generally available from tube material suppliers. Guideline has a large selection and many dealers all over Europe. There are even a few in France.
You can find them on Guideline's web site.
You can also try ordering online. Canadian Tube Fly Company has a very large selection of materials.
Martin
Hello, This is r
Hello,
This is really an outstanding exposé about tube flies.
Could you please tell me where we can get tube lining to attach cones on? I have problems finding some.
Many thanks
christophe
Have you played with
Have you played with pike flies on tubes?
RR;
Your are welc
RR;
Your are welcome!
Yes, there are floating tubes, and some people even tie dry flies on tubes. I have personally never seen or owned a floating tube, but have seen the dries mentioned a few places.
Small flies tied on the most lightweight plastic tubes will probably also float if dressed with floating materials or treated with a floatant.
Martin
Thank you for the co
Thank you for the comprehensive coverage of tube material. Are there floating tubes? RR
can you recommend so
can you recommend some certain tube system that I can start working on? for example, do the eumer tubes work like legos so i can just swap different bodies and cones? I have been using the eumer ball tube which I don't see on the site with very much success... this tube works so that you can tie it either way and make some very nice flies.
After growing up in
After growing up in the Pacific Northwest amist some of the finest steelhead and samon fisheries I have fished for samon and steelhead by almost all methods. This is one of the finest articals on the basics of tube flies I have read. With out going into detail on just one fly it explains what a tube fly is and what it is used for. It got my mind working and ideas flowing for new patterns to try . I am looking forward to tying and fishing tube flies this year.