The grand prize for the Flymeister 2001 contest was a custom built fly rod made by Neal Hall, owner of Classic Destiny rods and president of the Custom Rod Builder's Guild.
One of the most pleasurable aspects of being "behind the scenes" of Flymeister 2001 was being able to work with such motivated and highly skilled people as Neal Hall, Todd Vivian, Bob Venneri, and Mike McCoy. The four of them together made it possible for us to offer such an outstanding grand prize, which no doubt helped us attract such talented tyers as the winner of the prize, Mikko Stenburg.
All of us at GFF were curious what the winning rod would look like. It's not often we see a truly custom built rod. As luck would have it, Neal took some pictures along the way and offered to share them with us for a brief article.
Neal: "Mikko and I corresponded several times about what he wanted for his custom built rod. He told me that he wanted to use it for fishing in fresh to brackish water to catch trout, and steelhead. He wanted a long rod in the 7 weight class. He told me that he was average build and his hand was medium size. He wanted a full wells grip and nickel silver hardware with chrome guides. He also wanted a maple burl reel seat with a fighting butt." The results were:
Blank: Lamiglas
XMG-50, 9'6" 3-piece 7-weight
Guides: Snake Brand, 2 red agates stripping guides, the rest chrome snakes
Reel Seat: Venneri uplock with removable fighting butt
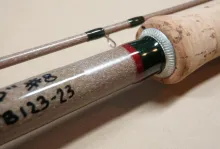
Grip: Custom made from cork, burl cork, and plexiglass
At this point in time, the gang at GFF would like to once again thank the sponsors of Fly Meister 2001, starting with the four people who made this grand prize possible:
Classic Destiny
Lamiglas
Snake Brand Snake Guides
Venneri Reel Seats (www.venneris.com is no more)

Neal places the guides on the rod using a tool designed by Don Morton of the Custom Rod Builders Guild. The tool identifies the correct placement of the guides using the equal angle or the progressive angle theory. The tool can be used in the vertical position or in this case it's laid out on the floor. Neal can't get the tool to fit into his basement workshop in the vertical position.

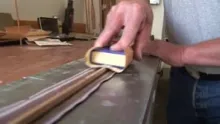
Neal: "When I was designing the grip (handle) I knew I wanted something different and unique. I was lucky enough to find some Plexiglas that was the same color as the rod blank and thought I could incorporate it into the handle. I did some experimenting and found I could glue it together and have no glue line show so I could make it as thick as I wanted. I turned the three plexiglass pieces down to the approximate size that I needed. I Cut the cork and burl rings to the required thickness and glued the handle using U-40 Rod Bond. Then it was a simple mater of turning, shaping and sanding the handle into a full wells that would fit Mikko's medium size hand. I use sandpaper grit size down to 1200 to give the handle a velvety feel. I also had to polish the plexiglass with plastic polish and the buffer wheel in my dremel tool."

Making sure the reel is aligned with the guides.

Another view of checking the reel and guide alignment.

Neal: "I wanted to use the progressive angle guide setup. There were going to be a lot of guides and Mikko told me that he wanted snake guides. Therefore I needed the lightest ones I could find. I also wanted to use agates for the stripers to blend in with the thread color. I called Mike McCoy at Snake Brand Guides and ask if he would contribute to this prize rod. Mike responded immediately with the darkest red agate he had. The effect is striking on the burgundy colored blank of the XMG50. After many trials I decided to use a dark pink color thread. Its color number 3296 from J A Rice Thread Company. I did not use color preservative which allowed the thread to turn opaque and take on the color of the blank. Accent color is Metallic Fuchsia Hologram."

A beautiful maple burl reel seat from Bob Venneri with a detachable wooden fighting butt.

Neal added a beautiful feature inlay of golden pheasant feathers, adding the final aesthetic touch to a beautiful and functional custom fly rod.
- Log in to post comments



Carsten, the inlay d
Carsten, the inlay do bulge on the first coat of epoxy. It take a few layers of epoxy and a little sanding to get the smoothness you might be looking for. At least that was the case when I did mine.
Paul
Inlays of feather is
Inlays of feather is new to me. How come they don't bulge?
A very nice article
A very nice article for the most part. I only wish you had arranged for a better picture of the completed rod. Knowing what it would take to win such an event, it would have had to be awesome to look at.
You don't get any impression of overall aesthetics in any of the pictures above. Kinda like buying a steak and having the waitress bring you the sizzle. You are a professional grade writer.......find a pro to take your pics.
You will go far.........good luck and have a good life doing what you love........fishing and writing about fishing!
You truly are the lucky man you alluded to at the beginning of your fine review.
Oh!.........and thanks for contributing.
Respects.......John Michael
Donald,
Check out
Donald,
Check out Ole Willers' series Build a Rod. He has a whole article on placing guides and wrapping them.
Martin
I have a question, i
I have a question, i've read your material on fly rod building, but i don't recall reading how you align the guides from the reel seat to the tip top, did i miss something?
I would like to star
I would like to start a hobby of building my own fly rods, can you give me some adv where to purchase equipment, rods etc. and even how to get started ? Thank you
I believe the thread
I believe the thread turned translucent and not opaque.
"I did not use color preservative which allowed the thread to turn opaque and take on the color of the blank."