
Rod builder Dave Lewis of Performance Flyrods teaches you how to finish a cork grip. Dave covers the whole process from selecting cork over glueing to the final shaping.
Why I turn my own
First, I might relate why I have continued to do my own grips in spite of very good quality grips being available preformed. As I mentioned I started doing them long ago because that was the only way. Now I do my own grips primarily because I like to be able to have my own shapes. If you look at my
rods, you can see that my grip shapes are a part of my overall style. To put someone else's grips on my rods would be like a painter having someone else do part of his painting. The results might be just fine but it might not be the total communication of the painters art that he had hoped.
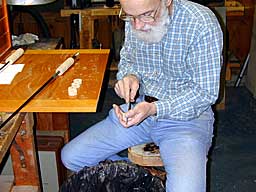
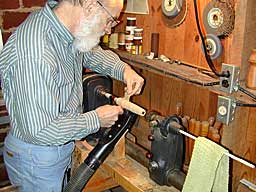
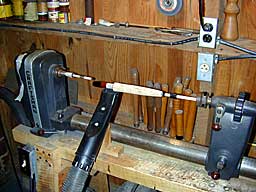
The author - rod builder Dave Lewis of Performance Fly Rods - preparing the cork rings in his workshop.
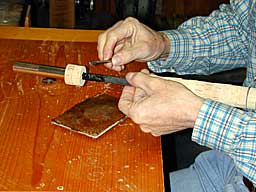
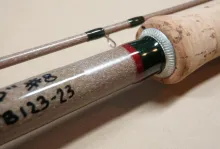
A round file 'rat tail' style is the best for the fitting of the rings.
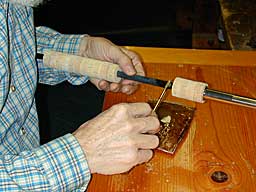
After filing the holes and making sure they fit the blank snugly, you are ready to glue the rings in place.
Glue must be used sparingly to prevent very noticeable glue lines.

Dave's custom build clamp allows two grips of any length tobe glued at the same time.
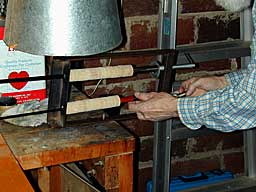
Drying time is usually over night, though with heat, grips can be turned in a couple hours.
I always feel one of my rods is, in a substantial way, my personal expression. The grip is, after all, the part of the rod you are most intimate with. I like it to be my grip - my expression. Doing my own grips enables me to do just what a customer wants too. Just last week I did a rod for a friend of many of you in Colorado. The primary element of the rod that he focused on was the grip shape. My being able to come up with exactly what he wanted in a grip shape is what brought him to me. Believe me his grip is not like anything you can buy in a preformed fly rod grip. I'll let him tell you about the rod some time.
The lathes
As many people have observed, I do indeed turn my own cork grips. I have always done them that way because in the beginning there was no such thing as a preformed grip.
Back when I was a kid I made my own grip turning lathe with four pillow blocks, a couple of pulleys and a motor I got from an old appliance. I still have that original lathe but don't use it any more. In fact I robbed the motor to use on another lathe I built more recently. The whole affair was really quite simple. One end had a shaft with a pulley on it, between two pillow blocks, which was run by belt from the motor. I drilled a hole in the end of the shaft and tapped it with a 1/4" tap so I could thread threaded rod into it. Corks were glued up on a foot long piece of threaded rod and tightened on either end with nuts. I waxed the rod to keep the glue from sticking and used the nuts to clamp the cork till the glue dried. The other end of the rod threaded into another shaft that ran in two more pillow blocks. It could slide back and forth to accommodate different lengths of threaded rod, and facilitate getting the rod in and out of the contraption.
With that little home built lathe, I made my own preformed grips. The whole works turned at motor speed - 1725 rpm. That was a bit slow but worked fine. I finally gave the contraption up a long while back when I started doing rods to sell. I then started using two other lathes which enabled turning the grips already glued up on the blank. I'll detail those two lathes in the next section.
I inherited a Sears wood lathe from my dad. It is nothing special, just one of those with the big round pipe for the lathe bed and the simple threaded head stock with an inner Morse taper and a plain dead center tail stock. Luckily, many years ago, when I was doing some gunsmith work, I traded an old Colt pistol for a 10" Atlas metal lathe. I used to use it to do barrel work for the guns I built for folks. I gave the guns up long ago but kept the lathe through all of my other mechanical endeavors, including lots and lots of motorcycle work that leaned on its abilities lots of times. With that lathe I currently do winding checks and a few other rod items, but not grips. I did use it to make an aluminum stud with a Morse taper that is threaded to accept mandrels of various sizes that will, with a little shimming with masking tape, fit into the butt sections of all the blanks I build. That stud is a good fit in the head stock of the Sears lathe and holds the butt end of the rod for grip turning.
The tail stock end required a hollow attachment that would allow the rod blank to pass through. I machined and threaded a replacement for the dead center one. It has a ball bearing affair on the end that with a small bushing and some tape over the blank allows a perfect fit of the upper end of the blank above the grip. To keep everything from flying apart under speed, I made a steady rest that can be moved along to suit the length of the blank after the tail stock. Towels draped over the blank in a couple places keeps the whole works from whipping and breaking.
I have mounted a shop vac hose attachment on a little wooden mount that can position it under the grip to catch all sanding dust when I do the turning. The lathe turns at twice motor speed - about 3400 rpm. Now that is my main lathe. I have turned nearly 3000 grips with it and have been very pleased with its performance. I actually paid nothing for the whole thing.
The lathes II
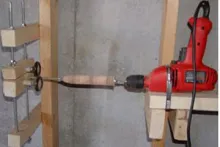
The Sears lathe does all my serious grip work. Several years ago I realized I needed a lathe I could turn a grip on a finished rod. I sometimes have a customer who would like a grip slimmed just a bit to suit his personal needs. So I set about to make up a little lathe to turn butt sections of rods that I had already built.
For that project I used the old appliance motor from my original lathe. I machined a hollow tubular affair that I attached to the shaft of the motor that is large enough to accept the back end of a reel seat on most any rod, by covering it in a fairly thick wrap of masking tape. I wrap it tight till it is a good snug fit into the tube. On the other end, I made up a steady rest affair using three caster wheels mounted on a little stand with the top wheel adjustable to make a snug fit on the rod. I found the wheels had hole diameters exactly the size of some metric bolts I had left over from my motorcycle mechanic days. I machined the wheels to have a nice flat surface.
I simply bush up the back of the reel seat with tape to fit, put a good bushing of tape on the butt section a couple inches above the top of the grip and another tape pad up along the lathe base at a good spot for another steady rest which is nothing more than a hole in a piece of plywood that the blank can run through. Like the Sears lathe I drape towels over the blank in a couple places and go at it. The lathe base is nothing more than a piece of 2X6. I can attach the first and second steady rest at any position along its length.
I also have a vacuum cleaner pick up attachment to catch the dust. That lathe runs at only motor speed - 1725. It is slow but, to just slim down a grip, it is just fine. I have the price of the three caster wheels in this lathe. The wood was building scraps.
You can tell I haven't invested any money in my rod building equipment. My lathes cost almost nothing. My epoxy turning motors cost about $5 each for four of them, and I use an old single speed electric drill to turn the rod while applying the epoxy. I've rebuilt it several times. I will admit to being on my third drill though. I get them at yard sales for $3 each. Now computers, that is a different matter.
I'll talk about cork and doing grips, next.
Cork quality
Quality cork for rod grips is getting tougher and tougher to come by every year. It is hard for me to forget the rings I bought for fifteen cents each back in the 70's. Today's best is not in nearly the same league as that and costs nearly two dollars. I look for cork to be the most expensive item on a fly rod in a few years. I buy the best available and still am able to get only a few rings that are suitable for my best rods. All of it is usable though if you are careful to position it right. I'll talk more about that later. What I look for in cork is small pits and no heavy bark areas. Uniform color with limited bleaching and few dark drying streaks is most desirable. I stay completely away from "burl" cork. That is a dark composition looking cork item that has no place on a quality fly rod, in my mind.


The classical grip shapes: Cigar (top), Half Wells (middle), and Full Wells (bottom)
Fitting the cork
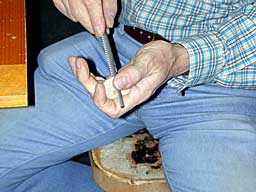
Ok, let's get down to business. I turn all my grips on the rod, so first thing is gluing the rings to the blank. Getting the best out of the rings always takes a little studying up front. They all have imperfections, more now than ten years ago. You can, if you are careful, minimize the consequences of them if you try and figure where the worse ones are going to fall and try and position the rings so that the worst spots are either sanded away or buried under an eighth inch of cork. That is not always easy and doesn't always work out, but it doesn't hurt to try. Filing the holes to fit the blank is easy and doesn't have to be all that exact. In fact I like to have a bit of a taper with the open end facing back to trap the glue as you slide the ring back to meet the last one.
Selecting the glue
I use epoxy. I have used marine glue, white glue, Cork Bond, Pliobond, plastic resin glue, the new polyurethane glue, polyester resin, and probably a couple others I'm forgetting. I liked polyester resin best for a long time. That is the stuff you use to impregnate fiber glass when covering boats and the like. It is not a tremendously strong adhesive, but cures
totally without shrinkage and allows cleanup with lacquer thinner, removing any trace of glue line. The stuff really works great, but you have to have the front cork really tight to prevent loosening
Like I said, the stuff doesn't hold like epoxy, but holds pretty well. Trouble with the stuff is the vapors remaining for a long long time. They simply irritated me to the point of not being able to stand them any more. I used a ventilator fan and
vacuumed the cork dust, but the smell remains in the cork for months. It even got to me when I did the thread wraps. I have opened rod cases two years later and smelled the stuff. I had to quit with it several years ago.
I started using epoxy then and am pretty satisfied with it. You will get very visible glue lines with it if you get it out to the surface. I am careful to use it sparingly enough to not have it come up along the edges of the rings much. I think a grip is better if the cork edges are not glued together on the outside surface, anyway. The rings can "work" that way.
I have used the new polyurethane glue some too. Glue lines are the same problem with it. I use it sparingly too. The problem with it is that it foams and expands while it cures and will ooze out of any even remotely loose joint. That is a big problem with grips that face on open areas with uplocking reel seats. The stuff will come out in a big foaming, oozing mess. I only use it in grips that will be tight in the back and the front. It does a good job.
Everything else is no good. Here is why. Any solvent glues - Pliobond, Corkbond, white glue, marine glue, any other glue that dries by having any kind of a solvent evaporate from it suffers from two problems. First and most dangerous is solvent entrapment. The stuff dries on the outside but remains soft on the inside. The only grips I have ever had work loose were glued with Corkbond several years ago. I had to replace two grips that worked loose in the middle. Second problem is shrinkage. Solvent glues, including old white glue, shrink as the solvent evaporates. You glue up the grip, let it dry over night, then turn it on your lathe. It looks beautiful. Two weeks later the glue finally pretty well dries out and you find that it has shrunk at each joint, pulling it in toward the blank, making a scallop at each ring joint. I have a bunch of old rods I built back in the early 60's that I glued with marine glue. Everyone of them has scalloped grips.
So, I glue them up, with epoxy now, clamp them with my clamp, which I describe below, and let dry. Then I set her up in my lathe and do the turning.
I welded up a clamp that I can use to clamp two grips. It allows the front of the blank to go through a hole in the one end of the clamp and has a threaded pusher that pushes up on the butt of the rod from the back. I can clamp my corks down against the reel seat just as hard as I like. I have another clamp affair I made from wood, where one end has a block with a hole in it to allow the blank to pass through, the other end is a threaded
pusher. That one allows me to move the front block so I can glue up any length of grip. I recently glued up a very long one that way.
Seems like werod builders are tool fabricators first and foremost.
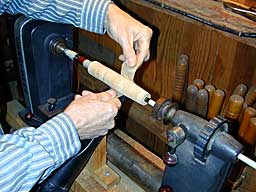
Initial truing and smoothing is with wide strips of coarse 80 grit sand paper.
A shop vacuum catches the dust and a towel draped over the blank prevents it from flying around and getting damaged.
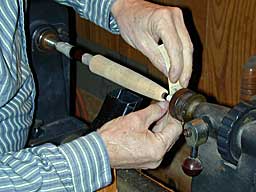
Increasingly finer grit sand papers dress the grip down to final shape.
The finished grip ready to be removed from the lathe.
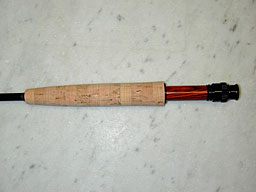
The grip and reel seat are done. The rod is ready for the guides.
First turn
Ok, lets turn the grip now. Now my reel seat is glued in place without the butt cap installed so I have access to the rear of the rod blank so I can fit a mandrel up into it. The cork rings have been reamed, slid down the blank, glued and clamped. The whole works is dry and ready to turn. Like in my last post I said I wrap a bush of tape around the blank above the grip to take a little delrin bushing that is a machined fit for the ball bearing tail stock. I completely cover the blank with masking tape too to prevent any damage when sliding through the hollow tailstock. I have the whole thing in place now, with a couple towels draped over it. I turn on the lathe and everything runs smooth. Some times it doesn't because of a little misalignment of the reel seat. Usually rotating on the mandrel gets it nice and concentric.
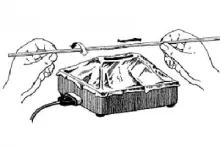
My lathe spins at about 3400 rpm - pretty fast. You can't use lathe cutting tools with cork. It is too rubbery and would simply gouge out in big chunks. You can use a wood rasp, but it clogs and really isn't all that necessary. The best cutting "tool" for cork is sand paper. I start with 60 grit, go down to 120 for final shaping and finish up with 320 wet and dry paper. My shop vacuum catches all the dust. If you do much of this you quickly learn the need to prevent dust and vapors of any kind. I'd not like to die of this vocation-avocation.
Some folks do a lot of measuring as they go along so they end up with just the right dimensions for their grip. The only time I do that is when I am trying to duplicate a previously done grip for a customer. The rest of the time I simply eye it and give it a squeeze or two. Some days are probably fat grip days, some days skinny days. It is, after all, an expression of my
inner self. A bit of my soul goes into each grip so I wouldn't think measuring would have much application.
Done turning
Well it's done and it looks pretty good.
I've got her out of the lathe and have taken the tape off and am ready to decide whether I need a little filler for a pit or two here and there.
Currently available cork is not very clear, though. Looks like we have a lot of holes that are a little bigger than I like. Best we fill them. Commercial preformed grips have filler that is applied like a paint then sanded off. I guess that is a good way. They retain a bit of a painted look, though in my mind. I like cork indentations to retain some of their indentation qualities, so I fill them later and clean off the excess with lacquer thinner after it has dried. That leaves the filler lower than the surface and retains that "feel" of real cork.
My filler is simple - cork dust mixed with a good glue. I like glues like Pliobond. They retain their flex and mix well with cork. Trouble is when you mix in the glue the whole works turns dark. Use that stuff and you have very dark pits. The secret is to mix in some cream or tan paint when you mix the whole works up. Add just enough to lighten the mixture to the proper color. Adding a little lacquer thinner will get the stuff to the right consistency. I mix up about three or four ounces of the stuff at a time. That is enough
to last me for a couple dozen grips.
Dig out the loose waste in the pits then apply the filler sparingly with a knife. Bring it to a little mound above the pit, so it dries flat. I let it dry for a couple hours then clean off the excess with a paper towel soaked with lacquer thinner. Rubbing with the towel around the grip will remove the excess without pulling the filler out of the pits. It ends up looking nice and natural.
Final step is gluing in the butt cap and fitting the winding check. Now, if you've been careful in your choice of rings and have positioned them so you don't have bad spots on the surface, if you've been conservative in the application of the glue you will have a first class job. Good - It looks like you have a really nice job and it is your grip with some of yourself buried in there.
- Log in to post comments


Hello I need help. L
Hello I need help. Lol I was wondering if I can put a new cork handle system on a already built rod? Also what size cork would would I need. The rod is a field & stream 7"6 in length if so how. Thanks
G'day Dave,
I'm ne
G'day Dave,
I'm new to rod building and was just verifying that you stack and glue your cork rings straight onto you'r blank? i have read a few other people's forums and they say to shape and then stack the rings on a piece of dowel where they are glued, removed and then fittted. what do you reccomend i do?
cheers, Luke
I'm new at rod build
I'm new at rod building. I want to build a rod with a pistol grip. I have the handle kit. How do I ream out the pistol grip. Do I have to cut the end off, ream the longer piece then glue the butt back on?
I am trying to make
I am trying to make my cork handles smaller to fit my hand. T&T wants 25 bucks a pop to do this. Do I need a lathe? Or can I do it by hand as the handle shape is already there, I just need it smaller??
Thanks
Dave
Dear Dave
I'm a Bas
Dear Dave
I'm a Bass fisherman from Texas. I use Shimano,Kistler & Falcon
rods. Priced from 90.00 to 300.00 each.
The palms of my hands are so big the standard grip size is to small.
Bass Pro makes a pole with a palm swell. Called a power grip. There are several
rod manufactures that make a pistol grip. Both are more comfortable.
Neither are offered on the high quality rods. Most of my rod handles
appear to be rings 1 inch long. Some have no ring marks.
Are the ones without ring marks turned from a single piece of cork?
My objective is to build a grip that fits my hand. Either from Rings or
a single piece. I can carve a prototype that fits my hand from a piece of balsa
wood thats cheap before I work with the cork. Would like your input & where to get
cork thats close to 2" square x 12'' or 1 1/2" X 2" x12" or 2" dia X 1" rings.
If this works & your interested in building some big boy grips. I know a lot of big handed
Texans that would sign up. Thanks for any & all input.
Hi Mike
The best re
Hi Mike
The best remover of glue residue from labels, on any surface is normal cooking oil. Apply over label or residue, leave for 10 minutes and wipe off.
Regards Korrie
Dear Dave,
Dear Dave,
I recently purchased a used sage fly rod. The rod looks like brand new except the store I purchased it from put a price sticker on the cork handle. I tried to remove the sticker but could not get all of the sticker or adhesive residue off of the cork. Do you have any suggestions on how I might remove it? If I sand it do I need to seal it?
Any help would be appreciated. Thanks, Mike