Frogs are high on the menu for many fish If there's one thing that gives away a swimming frog, it's the legs!

All freshwater predatory fish species have a special leaning for frogs of all sizes. They are a good and relatively easy to obtain source of protein but they are not very abundant. Anyway many fish seem to have included in their genome a primal attraction for amphibians. From trout to giant pike, in still waters or rocky rivers, sub Arctic creeks to tropical lakes. Almost any predator expect to see an unwary frog to have the best lunch of the year.
Some time ago I developed these wiggling frog legs, which I have used with very good results. But I had not thought that they were something new until recently when I realized that I had not seen them anywhere before. So I decided to make a tutorial of this simple and effective system to tie them.
This design has some characteristics that make them a very good choice for tying successful frog patterns:

- They are easy to tie and easy to adapt to any frog imitation pattern.
- They are tied with common materials, which almost any fly tyer knows how to with.
- They can be tied in as many variants as anyone can imagine.
- They are lightweight, they float because their structure is made of foam, something that helps the movement and stability of any surface fly.
- In the water they have very natural movements, similar to what a real frog would do with its legs while swimming.
- By being floating and giving stability to the fly in the water, they help the fly pattern to have a natural movement that will attract the attention of the fish.
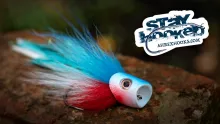
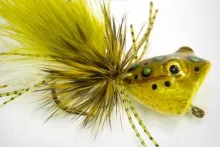
For these tying instructions I use a “firetiger” color frog on a 4/0 saltwater hook as an example. This is something I use on many peacock bass flies. The sizes and colors of the materials will vary according to the style and size of the fly you want to tie.
For a pair of legs, cut two strips of 2 mm closed cell foam of 5 cm long by 0.5 cm wide. Round the tips with scissors and then melt them a little with a lighter so they get flat and rounded edges.
Cut the top foam strips a smidgen longer than the thread base and round them in both ends. You can heat the ends carefully over a lighter flame to round them perfectly. You can cut the foam strips in different colors so you can get the legs in two tones, one on top and the other on the bottom.


Cut six rubber legs, 10 centimeters or about 4 inches long. In this case I have put two yellow, two chartreuse and two orange together to match the firetiger color scheme of the fly I chose.

The legs are tied on a needle that could be fixed on the vise directly, or on a tube-tying tool. This makes the process much easier.


The tapering of the needle will make easy to remove the legs from the base once they are finished.
It is necessary to put a small amount of dubbing wax on the needle. Without some “lubrication” removing the finished legs can be a bit difficult.

A thread base should be made over the needle in the length of the foam strips. This makes the parts stay firmly in place.

The rubber legs should be tied centered on the needle thread base, so that the same length of them spreads on each side.

Line up the rubber legs along the needle. They need to stick out equally long in both ends. The rubber legs should be tied along the entire bed of thread on the needle without tightening the thread too much, just holding them in place. It will be very difficult to remove the legs from the needle later if they are tied on too tight.

Attach the foam strip that goes on the top with two or three thread wraps, leaving just a small part of the rounded tip over the rubber leg tags.

Repeat the procedure with the lower foam strip, tying it in exactly the same place where the top one was tied in, but on the opposite side, of course...

Lift the foam strips and advance the thread on the base of rubber legs about 0.4 to 0.5 centimeters or 1/5 inch to make the second segment.

Tie the second segment as you did the previous one, starting with the upper foam strip.
Tie the bottom foam strip as in the previous segment.


Continue tying in the same way until you reach the last segment, making sure that your last segment ends just shy of the end of the foam strips.

Finish with a whip finish and a tiny drop of superglue on the first and last knots to prevent them from unraveling later.

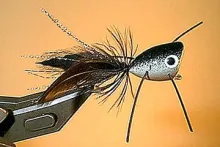
Remove the legs from the needle applying some pressure. Your Wiggling Frog Legs are ready.

To set the legs on the hook you should have tied the rest of the fly before. You can attach them on a tube (fly) or an extension shank too.

This tying method gives good results for the hard bodied types of flies. Once the body has been secured and finished, make sure that a short piece of hook shank is left bare behind the body. Cover this shank with tying thread. Lay the center of the legs across the hook over the thread base on the hook shank where the legs are going to be fixed. In this phase you of course orient the legs so that the color you want on top is upwards - in this case the chartreuse.
Secure the legs wrapping the thread in figure eight wraps, in the same way that lead eyes are usually tied to the hook.


Cover the tied in segment with a material. I like to use Estaz, Ice Chenille or something similar in a matching color. That gives the frog some style and adds some glitter. When tying in this material you can use it to press the legs rearwards to create a more frog-like leg position.
Wiggling Frog Legs will give a natural look to any frog pattern, including poppers or foam sheet flies, in the colors you want.

Thank you for your interest in this tutorial. For anything you want to ask, please feel free to write.
- Log in to post comments